How to Set Up Google Search Console: Complete 2026 Guide
Learn how to set up Google Search Console correctly with this step-by-step guide. Compare 5 verification methods, choose domain vs URL prefix property, and avoid common setup mistakes.

How to Set Up Google Search Console: Complete 2026 Guide
Configure Google Search Console wrong and you'll make decisions with incomplete data for months—or never realize your data collection has been broken all along.
Set up the wrong property type, choose a verification method that breaks during your next site update, or miss critical data sources. You'll either lose months of historical data or spend weeks figuring out why reports don't match reality.
This guide covers all five verification methods, when to use domain properties versus URL prefix properties, and best practices that prevent common setup mistakes.
Before You Begin: Prerequisites
What You'll Need
A Google account: Personal Gmail or Google Workspace. The account becomes the property owner—choose carefully for client or organization setups.
Website access: Verification requires access to your hosting control panel, CMS, DNS settings, or existing Google tools like Analytics or Tag Manager. Specific access depends on your chosen verification method.
Property type decision: Domain property or URL prefix property. We'll cover this below.
Understanding Access Levels
Owner: Full control. Add/remove users, delete property, perform all actions. Every property must have at least one verified owner. Use for site owners and primary SEO leads.
Full User: View all data, request indexing, submit sitemaps. Cannot add/remove users. Use for SEO specialists, developers, and anyone needing full data access.
Restricted User: View most data with limitations on manual actions or security issues. Use for junior team members, clients wanting visibility, or read-only partners.
When to use each level: Agencies—Owner for primary account managers, Full User for SEO analysts, Restricted User for client stakeholders. In-house—Owner for marketing director or site owner, Full User for SEO specialists and developers, Restricted User for cross-department stakeholders.
<VisualPlaceholder description="Table comparing permission levels with checkmarks showing capabilities for each level" />Verification Methods: Complete Comparison
Google Search Console offers five verification methods. Each has specific advantages, disadvantages, and use cases.
Method 1: HTML File Upload
How it works: Download a verification HTML file from GSC and upload it to your website's root directory. Google checks for this file to confirm site access.
Pros:
- Simple for anyone familiar with file management
- No code changes required
- One-time setup, persists indefinitely
- Works for any site allowing file uploads
Cons:
- Requires FTP, SFTP, or hosting control panel access
- Can be deleted during site migrations or cleanups
- May be blocked by server configurations or CDN rules
- Requires knowledge of file directory structures
Best for: Static sites, developers comfortable with file management, situations preventing direct code modification, or when other methods aren't available.
Step-by-step instructions:
- In GSC, select "HTML file upload"
- Download the verification file (format:
google1234567890abcdef.html) - Upload to your root directory (accessible at
yoursite.com/google1234567890abcdef.html) - Confirm accessibility by visiting the URL—should show "Google site verification"
- Return to GSC and click "Verify"
Important notes: Never rename the file. Ensure it's accessible to Googlebot (not blocked by robots.txt or authentication). The file must remain on your server to maintain verification.
<VisualPlaceholder description="Screenshot showing HTML file download in GSC and successful verification confirmation" />Method 2: HTML Meta Tag
How it works: Add a meta tag to the <head> section of your homepage. Google detects this tag when crawling your homepage.
Pros:
- No separate files to manage
- Works well with CMS platforms like WordPress
- Easy for non-technical users through CMS interfaces
- Add via plugins, theme editors, or tag managers
Cons:
- Must remain on homepage permanently
- Can be removed during theme updates or redesigns
- Only works in
<head>section (not body) - May require theme file access or specific plugins
Best for: WordPress sites, CMS platforms, non-technical users with header access, or when file uploads are difficult but code access is available.
Step-by-step instructions:
- In GSC, select "HTML tag"
- Copy the meta tag (
<meta name="google-site-verification" content="abc123..." />) - Access your site's header section (WordPress: header.php, custom code section, or plugins like "Insert Headers and Footers")
- Paste the tag in
<head>, before the closing</head>tag - Save and clear all caching (site, CDN, browser)
- Verify the tag appears in page source (right-click > View Page Source)
- Return to GSC and click "Verify"
Pro tip: WordPress SEO plugins (Yoast, Rank Math, All in One SEO) have dedicated fields for verification codes—no theme file editing required.
<VisualPlaceholder description="Screenshot showing meta tag in GSC interface and another screenshot showing the meta tag visible in page source code" />Method 3: Google Analytics Verification
How it works: GSC uses your existing Google Analytics tracking code to verify ownership—no additional implementation required.
Pros:
- Automatic if Google Analytics is already set up
- No additional code or files needed
- Quick verification
- Works immediately for sites using GA
Cons:
- Requires GA tracking code installed site-wide
- Verification tied to GA property—changes affect verification
- Requires Admin-level access in Google Analytics
- Must use standard GA code (async snippet)
Best for: Sites already using Google Analytics, quick verification when managing both GA and GSC, or GA Admin access with limited website access.
Requirements:
- GA tracking code on all pages
- Admin-level GA property access
- Same Google account for GA and GSC (or same organization)
Step-by-step instructions:
- Confirm GA tracking code is site-wide (check view-source on multiple pages)
- Verify Admin access in GA property (check GA admin settings)
- In GSC, select "Google Analytics"
- GSC automatically detects your GA tracking code
- Click "Verify"—verification happens instantly if configured correctly
Important: Works with Universal Analytics (analytics.js) or Google Analytics 4 (gtag.js) only. Won't work with deprecated codes or GTM implementations of GA.
<VisualPlaceholder description="Screenshot showing Google Analytics verification method selection in GSC" />Method 4: Google Tag Manager Verification
How it works: GSC verifies ownership through your GTM container.
Pros:
- Leverages existing GTM implementation
- Container-level verification works across entire site
- No additional code or configuration needed
- Ideal for sophisticated tag management
Cons:
- Requires active, published GTM container
- Requires Publish permission in GTM (not just read access)
- Verification tied to GTM—container access changes affect verification
- Won't work if GTM is in preview mode only
Best for: Sites using GTM for analytics and marketing tags, advanced implementations with multiple tracking tools, agencies managing client tags through GTM, or GTM access with limited direct site access.
Requirements:
- GTM container published and active
- Publish-level permission in GTM container
- Same Google account for GTM and GSC (or same organization)
Step-by-step instructions:
- Confirm GTM container is published and live (check view-source for GTM script)
- Verify Publish permissions in GTM (check GTM Admin > User Management)
- In GSC, select "Google Tag Manager"
- GSC automatically detects your GTM container
- Click "Verify"—instant if permissions are correct
Note: GTM container must have been published at least once. Created but never published won't work.
<VisualPlaceholder description="Screenshot showing GTM verification method in GSC interface" />Method 5: DNS Verification (RECOMMENDED FOR DOMAIN PROPERTIES)
How it works: Add a TXT record to your domain's DNS settings. This proves domain control at the DNS level—the most authoritative verification method.
Pros:
- Verifies entire domain including all subdomains automatically
- Most robust—never breaks from site updates, redesigns, or CMS changes
- Required for domain properties (recommended property type)
- Works even if website is temporarily down
- Domain authority level verification
Cons:
- Requires DNS settings access (usually through domain registrar)
- DNS propagation takes 5 minutes to 48 hours (usually under 1 hour)
- More technical than other methods
- Interface varies by DNS provider
Best for: Domain properties (required), agencies managing professional implementations, large sites with multiple subdomains, long-term setups needing stability, or most reliable verification method.
Step-by-step instructions:
- In GSC, select "Domain name provider" (DNS)
- Copy the TXT record value (
google-site-verification=abc123...) - Log in to your domain registrar or DNS provider (GoDaddy, Namecheap, Cloudflare, etc.)
- Navigate to DNS settings ("DNS Management," "Advanced DNS," "Zone File")
- Add a new TXT record:
- Type: TXT
- Name/Host: @ (or leave blank, varies by provider)
- Value: Paste verification string from Google
- TTL: Use default (often 3600)
- Save the DNS record
- Wait for DNS propagation (use whatsmydns.net to monitor)
- Return to GSC and click "Verify"
- If verification fails, wait longer (up to 48 hours) and retry
Troubleshooting DNS verification:
- Immediate failure: wait 1+ hour and retry
- Ensure no extra spaces before/after TXT record value
- Some providers require @ in Name field, others want it blank—check documentation
- Cloudflare: set record to DNS Only (not Proxied)
- Verify DNS propagation:
nslookup -type=TXT yourdomain.com
Which Verification Method Should You Choose?
Decision framework:
Setting up a domain property?
- YES: Use DNS verification (TXT record)—required for domain properties
- NO: Continue
Already use Google Analytics or Google Tag Manager?
- YES: Use GA or GTM verification—fastest since code is already installed
- NO: Continue
Have FTP or hosting control panel access?
- YES: Use HTML file upload—reliable for URL prefix properties
- NO: Use HTML meta tag—works with virtually any CMS
Best practice: Add multiple verification methods as backup. If one breaks (during site redesign), others maintain verification. Critical for agencies and large sites where losing verification causes data gaps.

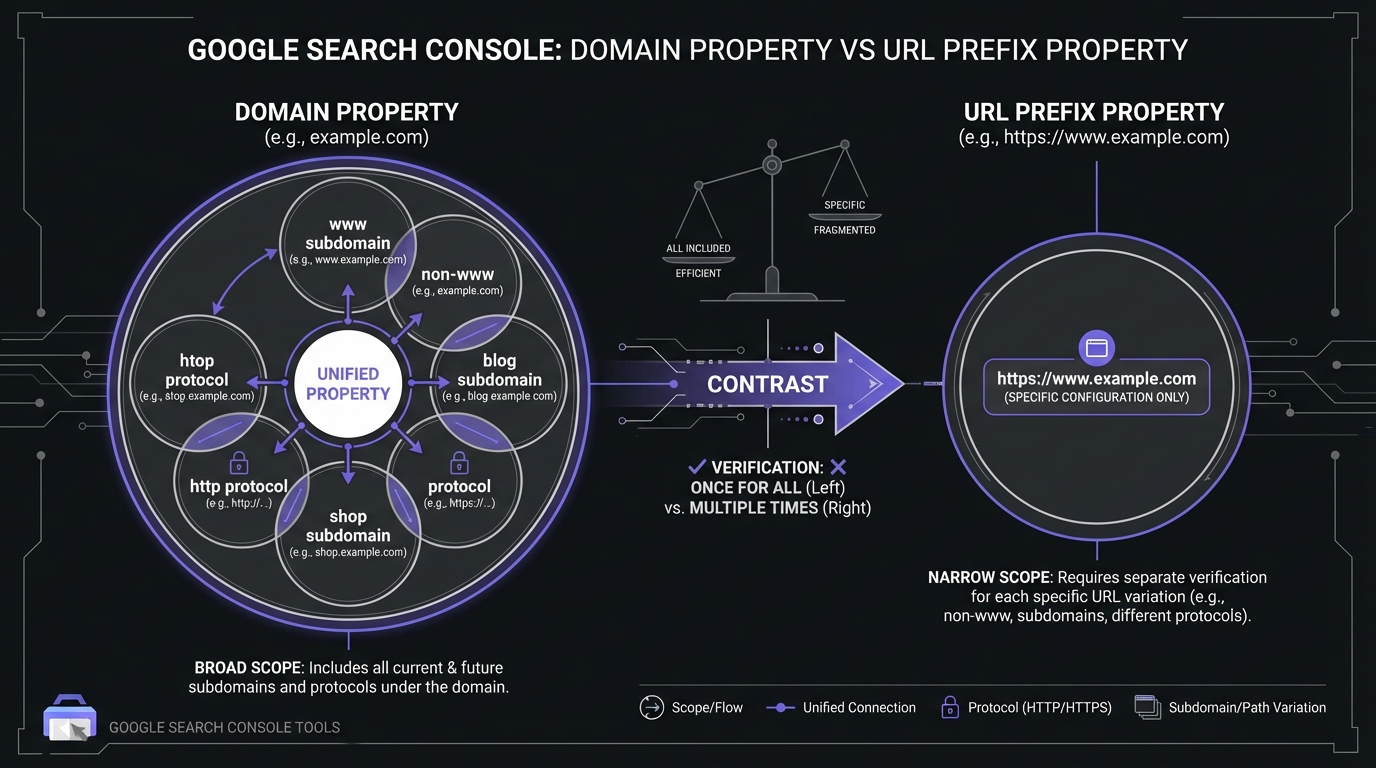
Domain Property vs URL Prefix: Critical Decision
Choose between domain property or URL prefix property before verifying. This affects what data you see and how you manage Search Console.
What's the Difference?
Domain Property (sc-domain:example.com):
Aggregates data from all domain variations:
- All subdomains (www, blog, shop, m, help, etc.)
- All protocols (http and https)
- All paths and pages
- Example: example.com includes www.example.com, blog.example.com, shop.example.com, m.example.com
- Verification: DNS only (TXT record required)
URL Prefix Property (e.g., https://www.example.com):
Tracks one specific URL configuration:
- Specific protocol only (http OR https, not both)
- Specific subdomain only (www OR non-www OR specific subdomain)
- Granular control and data separation
- Example: https://www.example.com is separate from https://example.com and http://www.example.com
- Verification: Any method (HTML file, meta tag, GA, GTM, or DNS)
Domain property = wide-angle lens (entire web presence). URL prefix = zoom lens (specific configuration).
Which One Should You Use?
Use Domain Property if:
- Want all data in one unified view (recommended for most sites)
- Site uses subdomains for different sections (blog, shop, help)
- Setting up new property from scratch
- Have DNS settings access
- Want simplest long-term management (one property vs many)
- Need combined http and https data during migration
Use URL Prefix Property if:
- Need to separate http vs https data
- Need to isolate www vs non-www data
- Manage subdomains as separate sites with different teams
- Don't have DNS settings access
- Have legacy properties requiring historical consistency
Recommendation: Domain property is the modern standard for 95% of sites. Google indicates domain properties are the future, providing the most complete view of search presence.
Can You Have Both?
Yes, and this is actually common during transitions:
- Set up a domain property for your overall view
- Keep or add URL prefix properties for specific troubleshooting or historical comparison
- Data is not duplicated—these are just different views of the same underlying data
- The domain property will show aggregate data while URL prefix properties show granular data for their specific configuration
Many sites maintain a domain property as their primary dashboard while keeping URL prefix properties for legacy reporting or detailed protocol/subdomain analysis.
<VisualPlaceholder description="Screenshot showing property selector dropdown with multiple properties for the same site (one domain property and several URL prefix properties as examples)" />Step-by-Step: Setting Up Your First Property
Complete Setup Process
-
Access GSC: Go to search.google.com/search-console and sign in
-
Add property: Click "Add Property" in property selector dropdown (upper left)
-
Choose property type:
- Domain property: Select "Domain" and enter domain only (example.com—no protocol, no www)
- URL prefix: Select "URL prefix" and enter complete URL (https://www.example.com)
-
Verify ownership: Follow verification steps for your chosen method
-
Wait for confirmation:
- HTML file, meta tag, GA, GTM: Usually instant
- DNS: Few minutes to 48 hours (usually within 1 hour)
-
Access property: Once verified, click "Go to property"
After Verification: Initial Configuration
1. Submit sitemap:
- Navigate to "Sitemaps"
- Enter sitemap URL (usually
/sitemap.xmlor/sitemap_index.xml) - Click "Submit"
- Wait a few hours for processing
- Check discovered URLs and errors
Why: Helps Google discover pages efficiently. Shows which pages Google knows versus actually indexes.
2. Set up email notifications:
- Settings → "Users and permissions"
- Check notification preferences
- Recommended: Enable all alerts for manual actions, security issues, or indexing problems
3. Connect Google Analytics (if applicable):
- Settings → "Associations"
- Link GA4 property
- Enables search data in GA for complete user behavior picture
4. Add team members:
- Settings → "Users and permissions"
- Click "Add user"
- Enter email and select permission level (Owner, Full User, or Restricted User)
5. Set international targeting (URL prefix only):
- Settings → "International targeting"
- Select target country if site is country-specific
- Note: NOT available for domain properties (aggregate all geographic data)
Multiple Properties: When and How
Many sites need more than one Search Console property. Here are common scenarios and how to handle them:
Scenario 1: www vs non-www
If you have a domain property: You're automatically covered—domain properties include both www and non-www versions.
If using URL prefix: Add both versions as separate properties (https://www.example.com and https://example.com). However, you should implement a 301 redirect from one to the other, making only one canonical. Monitor both briefly, then focus on the canonical version.
Scenario 2: Subdomains
If you have a domain property: All subdomains are automatically included. You'll see blog.example.com, shop.example.com, and any other subdomain in one aggregated view.
If you need separate data per subdomain: Add URL prefix properties for each subdomain separately. Use case: blog.example.com managed by a different team than shop.example.com, and each team wants their own isolated data view.
Scenario 3: International Sites
For different country domains (ccTLDs): Create separate properties for each country domain (example.com, example.co.uk, example.de, example.fr). These are genuinely different sites, so they need separate properties.
Best practices:
- Use domain properties for each ccTLD
- Implement hreflang tags to indicate language/country targeting
- Use the international targeting setting in GSC (Settings → International targeting)
Scenario 4: Protocol Migration (http to https)
Before migrating:
- Add the https URL prefix property before you start the migration
- Keep your http property active during the transition
- Monitor both properties during the migration period to track the data shift
After successful migration:
- Your https property should show all the traffic
- Keep the http property for historical reference
- Consider setting up a domain property for a complete view going forward
Verification Troubleshooting
Even with careful setup, verification problems can occur. Here's how to solve the most common issues:
Problem: "Verification failed" (HTML file or meta tag)
Possible solutions:
- Verify the file or tag is accessible at the exact URL Google is checking
- Clear all caching layers: site cache (WordPress plugins), server cache, CDN cache (Cloudflare, etc.), and browser cache
- Check your robots.txt file—make sure it's not blocking the verification file
- Ensure the meta tag is in the
<head>section, not the<body>(this is a common mistake) - Try accessing the verification file in an incognito browser window to bypass caching
- If using a security plugin or firewall, make sure it's not blocking Googlebot
Problem: "DNS verification not working"
Possible solutions:
- Wait longer—DNS propagation genuinely takes time, sometimes up to 48 hours
- Check that the TXT record was added correctly with no extra spaces before or after the value
- Verify you added the record to the root domain, not a subdomain
- Use a DNS checker tool like whatsmydns.net to confirm the TXT record is visible globally
- Some providers use @ for the hostname, others want it blank—check your DNS provider's documentation
- Try the verification again after a few hours—sometimes Google checks before propagation is complete
Problem: "You don't have permission to verify"
Possible solutions:
- For HTML file or meta tag: Ensure you have FTP/hosting access or CMS access
- For GA verification: You need Admin-level access in Google Analytics (not just Edit or View)
- For GTM verification: You need Publish permission in Google Tag Manager (not just Edit)
- For DNS verification: You need access to your domain's DNS settings
- Check that you're using the correct Google account (the one with the right permissions)
Problem: "Verification lost" (previously verified but now showing as unverified)
Immediate action:
- Don't panic—historical data is retained even after losing verification
- Re-verify immediately using any available method
Find the cause:
- Did you redesign your site or change themes? (might have removed meta tag)
- Did someone clean up files and delete the verification HTML file?
- Did DNS settings change? (TXT record removed)
- Was the GA or GTM code removed or changed?
Prevent future loss:
- Add multiple verification methods as backups (2-3 different methods)
- Document which verification methods are in place
- Add verification check to your site launch/update checklists
Best Practices to Avoid Losing Verification
-
Use DNS verification when possible: It's the most stable method and survives site redesigns, platform migrations, and code changes
-
Add backup verification methods: Don't rely on just one method. Add 2-3 different verification methods so if one breaks, others maintain your verified status
-
Document your verification method: Add this to your site documentation so team members know what's in place and won't accidentally remove it
-
Check verification status quarterly: Add a recurring reminder to verify you're still verified—catch issues before they become problems
-
Add verification to site change checklists: When updating your site, redesigning, changing themes, or migrating platforms, include "maintain GSC verification" as a checklist item
Post-Setup: Verifying Your Setup Is Correct
Verification succeeded, but is everything actually working correctly? Here's how to confirm:
How to Confirm Everything Is Working
1. Check that data is appearing: Wait 24-48 hours after verification, then check the Performance Report. You should see impressions data appearing (clicks may take longer if your site is new or has low traffic). Once you have data, you can start exploring the Queries Report to find your biggest opportunities.
2. Verify sitemap was processed: Navigate to the Sitemaps section and check the status. You should see "Success" with a count of discovered URLs. If you see errors, investigate and resubmit.
3. Confirm email notifications are working: Check Settings → Users and permissions to verify your email is listed and notifications are enabled. Send yourself a test by changing a setting (you can change it back).
4. Test the URL Inspection tool: Use the URL Inspection tool on 3-5 different pages on your site. They should show as "URL is on Google" (if previously indexed) or "URL is not on Google" with details about why (if new).
5. Verify subdomain coverage (domain properties only): If you're using a domain property, test the URL Inspection tool on URLs from different subdomains (www, blog, shop, etc.) to confirm they're all being tracked.
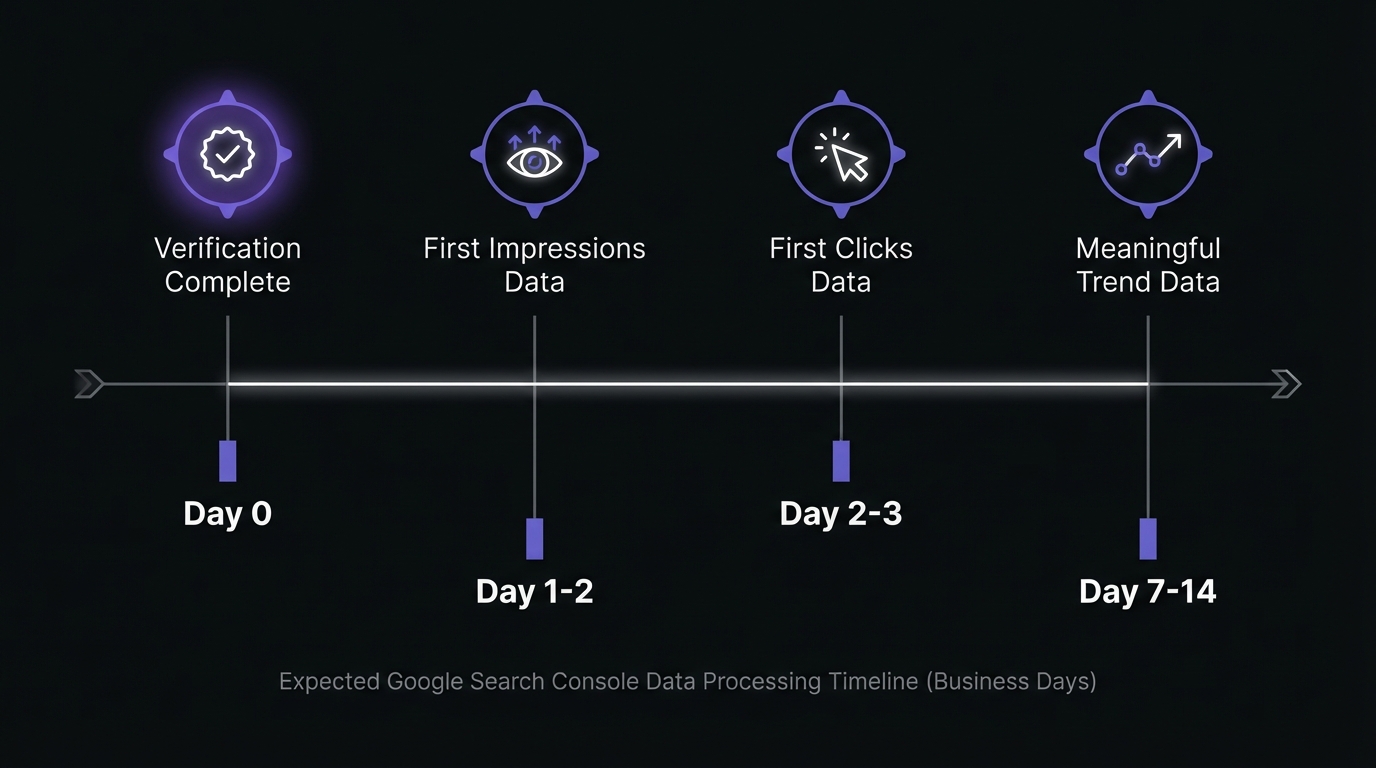
When to Expect Data
Understanding the data timeline prevents unnecessary panic:
- Verification status: Instant once confirmed (except DNS which can take up to 48 hours for propagation)
- First data appearance: 24-48 hours after verification
- Historical data: Google Search Console does NOT backfill data from before verification—you only get data from verification forward
- Full dataset: 7-14 days for a comprehensive dataset with enough data to analyze trends
This is why setting up GSC before launching a new site (or as early as possible) is critical—you don't want to lose those crucial first weeks or months of data.
Key Takeaways
- Domain property + DNS verification is the modern standard—use unless you have a specific reason not to
- Set up before launching new sites to avoid losing early data (GSC doesn't backfill)
- Use multiple verification methods as backup against accidental removal
- Submit sitemap immediately after verification for efficient content discovery
- Data appears in 24-48 hours—normal for initial population
Conclusion & Next Steps
Setup complete. You've learned:
- Five verification methods and where each works best
- Domain property vs URL prefix property (domain recommended for most sites)
- Complete setup from property creation through initial configuration
- Troubleshooting common verification issues
Immediate actions:
- Wait 24-48 hours for data to appear in Performance Report
- Verify sitemap was processed successfully
- Add team members needing property access
Your Next Step: Learn to Read Your GSC Data
GSC is now collecting search performance data. Once data appears (24-48 hours after setup), learn how to read and interpret it.
→ Next: How to Read Your GSC Performance Report (Beginner's Guide)
Understand the four core metrics (clicks, impressions, CTR, position), read the performance chart, and use tabs to find actionable insights. Learn what "good" looks like for each metric and identify your biggest opportunities.
Continue learning:
- Understanding GSC's Data Sampling and Limitations - What data GSC shows and what it doesn't
- Setting Up Your SEO Baseline - Establish your "normal" performance range for anomaly detection
- The Complete Guide to Google Search Console Analysis - Comprehensive guide to all GSC features
Pro tip: Export data immediately and set up monthly export routine. GSC keeps data for 16 months only—regular exports maintain long-term historical data for trend analysis.
Related Articles
- Understanding GSC's Data Sampling and Limitations - Why GSC doesn't show all your data and how to work around limitations
- How to Read Your GSC Performance Report (Beginner's Guide) - Master clicks, impressions, CTR, and position
- GSC Filters and Comparisons: A Complete Tutorial - Advanced techniques for extracting insights from GSC data
About the Author: This guide is maintained by our SEO Analytics Team, with contributions from technical SEO specialists who have set up thousands of Google Search Console properties for clients ranging from small businesses to enterprise sites.
Last Updated: January 21, 2026